A. Pengantar
Transparent Proxy adalah sebuah konsep dimana proxy dibuat transparan dari sisi user. Hal ini sangat penting karena disisi web browser user tidak perlu melakukan setting proxy, jadi tanpa sepengetahuan user sebenarnya bahwa mereka sudah diarahkan ke server proxy. Pada pembahasan ini akan dijelaskan mengenai konfigurasi transparent proxy dengan menggunakan squid. Untuk instalasi squid sendiri sudah saya jelaskan pada blog sebelumnya.
B. Topologi
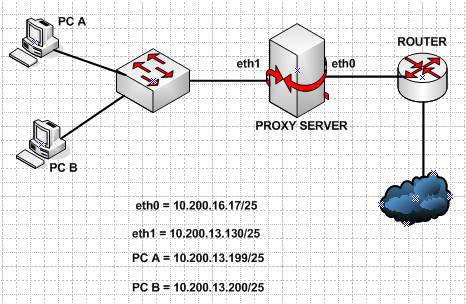
Dalam inplementasi transparent proxy bahwa squid dan transparent proxy berada dalam satu perangkat.

C. Konfigurasi
Hal utama yang harus diperhatikan dulu adalah bahwa pastikan squid sudah berfungsi dengan baik dan proxy sudah berjalan disisi user dengan settingan manual. Sekarang yang kita lakukan adalah membuat proxy yang transparan. Untuk menjalankan transparency proxy akan digunakan shell script seperti berikut :
Konfigurasi IP Tables :
Buat sebuah file dengan nama fw.proxy.
[root@ftp ~]# vim /etc/fw.proxy
Pastekan konfigurasi dibawah ini :
#!/bin/sh

# ----------------------------------

# See URL: http://www.cyberciti.biz/tips/linux-setup-transparent-proxy-squid-howto.html

# (c) 2006, nixCraft under GNU/GPL v2.0+

# ----------------------------------

# IP Address Squid Server

SQUID_SERVER="10.200.16.17"

# Interface Proxy server yang terhubung ke Internet

INTERNET="eth0"

# Interface Proxy server Yang terhubung ke LAN

LAN_IN="eth1"

# Port SQUID

SQUID_PORT="3128"

# DO NOT MODIFY BELOW

# Clean old firewall

iptables -F

iptables -X

iptables -t nat -F

iptables -t nat -X

iptables -t mangle -F

iptables -t mangle -X

# Load IPTABLES modules for NAT and IP conntrack support

modprobe ip_conntrack

modprobe ip_conntrack_ftp

# For win xp ftp client

#modprobe ip_nat_ftp

echo 1 > /proc/sys/net/ipv4/ip_forward

# Setting default filter policy

iptables -P INPUT DROP

iptables -P OUTPUT ACCEPT

# Unlimited access to loop back

iptables -A INPUT -i lo -j ACCEPT

iptables -A OUTPUT -o lo -j ACCEPT

# Allow UDP, DNS and Passive FTP

iptables -A INPUT -i $INTERNET -m state --state ESTABLISHED,RELATED -j ACCEPT

# set this system as a router for Rest of LAN

iptables --table nat --append POSTROUTING --out-interface $INTERNET -j MASQUERADE

iptables --append FORWARD --in-interface $LAN_IN -j ACCEPT

# unlimited access to LAN

iptables -A INPUT -i $LAN_IN -j ACCEPT

iptables -A OUTPUT -o $LAN_IN -j ACCEPT

# DNAT port 80 request comming from LAN systems to squid 3128 ($SQUID_PORT) aka transparent proxy

iptables -t nat -A PREROUTING -i $LAN_IN -p tcp --dport 80 -j DNAT --to $SQUID_SERVER:$SQUID_PORT

# if it is same system

iptables -t nat -A PREROUTING -i $INTERNET -p tcp --dport 80 -j REDIRECT --to-port $SQUID_PORT

# DROP everything and Log it

iptables -A INPUT -j LOG

iptables -A INPUT -j DROP
Kemudian simpan konfigurasi diatas.
Dari konfigurasi diatas IP Address Squid dan posisi eth0 dan eth1 jangan sampai salah, konfigurasi yang lain sama saja.
Ubah mode file fw.proxy:
[root@ftp ~]# chmod +x /etc/fw.proxy
Jalankan shell script :
[root@ftp ~]# cd /etc/

[root@ftp etc]# ./fw.proxy
Simpan konfigurasi iptables yang dihasilkan lewat shell script:
[root@ftp etc]# service iptables save

[root@ftp etc]# service squid restart
D. Testing
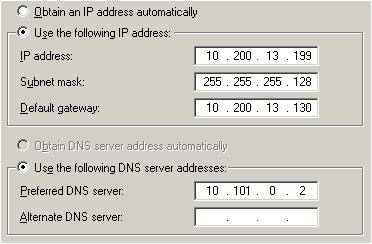
Untuk sisi user pastikan gateway ke 10.200.13.130, DNS ke 10.101.0.2 dan settingan web browser adalah no proxy. Perlu diperhatian DNS server jangan sampai kosong, jika kosong maka konfigurasi tidak jalan.
Dari PC A:
IP Address:

Browser:

Akses Internet:

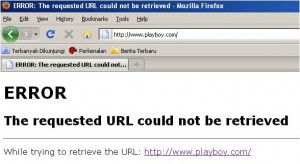
Situs yang di blokir :

Sekarang transparent proxy dengan squid sudah berfungsi dengan baik.
E. Referensi
http://feed.teguh.web.id/index-of-article/linux-install-transparent-proxy-dengan-squid-dalam-3-langkah.html
http://www.cyberciti.biz/tips/wp-content/uploads/2006/06/fw.proxy.txt

2 Responses to Transparent Proxy dengan Squid